Hi Sian, here is a pictorial narrative of making fruitypops with scans of supporting paperwork at the end. There are 42 in all which sounds a lot but there is not much text, just brief captions. I've expanded a little in the Evaluation of Completed Work (No. 38).
Unfortunately I was unable to recover the first set of pics taken when enlarging the design which was made of 96 numbered pattern pieces and took a couple of weeks to cut out. The pieces were then glued to an A1 piece of cellophane using PVA and a microbrush. As I was doing so, fruitypops emerged from the circle...
Ray kindly took the photos of me at work as part of the authentication process.
FRUITYPOPS
 |
| 1. The circle design morphed into a turtle shape as I enlarged it to an A1 pattern. |
 |
| 2. Tracing the shapes onto the Romeo using a black 0.1 Artlline pen |
 |
| 3. The original A1 grid showing the design traced ready for stitching |
 |
4. I trimmed the A1 Romeo to echo the turtle shape.
The larger piece became brittle and split as I stitched and it was difficult to pass it through the machine |
 |
5. Starting to stitch from the centre out.
You can see the numbered shapes and grid lines in this photo |
 |
| 6. First layer of stitch complete |
 |
7. Detail of stitching held up to the window to show the translucency (one of my research words)
Stitched using straight stitch and the same colour thread in the spool and bobbin, using a 'colouring-in' technique |
 |
| 8. Detail first layer of stitch |
 |
9. Top-stitching the shapes with straight stitch and whip stitch (which I've called mysterious lines)
inspired by the marks on my design papers |
10. Top-stitching of mysterious lines completed
based on the inked and stamped marks on the design papers
11. Detail of gold top-stitching using straight stitch and gold in the spool and bobbin
 |
12. Another detail of the mysterious lines using whip stitch
and magenta in the spool and blue and yellow in the bobbins |
 |
| 13. Excess Romeo trimmed away ready for dissolving |
 |
| 14. fruitypops goes for a swim in a tepid bath |
 |
| 15. fruitypops sinks and the Romeo starts to dissolve |
 |
| 16. Water drained from bath and fruitypops folded so that I could lift her safely out of the bath |
 |
| 17. Folded and patted between to old tea towels to absorb excess water |
 |
| 18. fruitypops pinned out on my table and 3 towel layers and left to dry for 24 hours |
 |
| 19. Detail of fruitypops drying, showing top towel and fine dressmaker pins used. After drying, I distressed the shapes gently between my fingers, and stretched some of the stitching to give it a worn look |
 |
20. Stitch and applique text finished.
The embroidery is flat on my table before hanging |
 |
| 21. Detail of quirky text, sauce centre |
 |
| 22. Detail of quirky text, best before and 5p |
 |
| 23. fruitypops hanging with sample and tissue paper labels and cast shadows |
 |
| 24. Detail showing pegs and hanging threads with cast shadows |
 |
| 25. Detail of sample with chewy text and tissue paper sample label |
 |
| 26. Detail of stamped nicky hampton tissue label using Xspectrum Fiesta stamp pad and mini letter stamps |
 |
| 27. Detail of stamped fruitypops tissue labels and stencilled year, 2013 |
 |
| 28. Pegged inked and stencilled tissue labels using original design papers |
 |
| 29. Detail with quirky text, bag plastic not currently recycled |
 |
30. Detail with quirky text, fruitypops, the inspiration for the title of the wall-hanging
I collected a lot of fruitypops lolly labels from the beach |
 |
| 31. Rummage shelf below fruitypops with threads, plastic, designs and images |
Presentation of Supporting Work
 |
| 32. Pin Board Wall of design sources with paper design of fruitypops at the top and rubbish and plastics used for homemade stamps on the shelf below |
 |
| 33. Detail of Pin Board Wall showing sample and photo of rubbish collected from the beach |
 |
34. Detail of Pin Board Wall showing corner of A3 design work and threads used.
See Order of Work sheet No. 39 for details of threads |
 |
| 35. Detail of Pin Board Wall showing first black and white colour designs and words used as inspiration. Also the green turtle wrapped in plastic that ultimately inspired the turtle shape of the finished design |
 |
| 36. Detail of Pin Board Wall showing colour design enlarged to an A3 design using inked and stamped tissue paper, words again and green turtle pics that inspired fruitypop's head and flippers. |
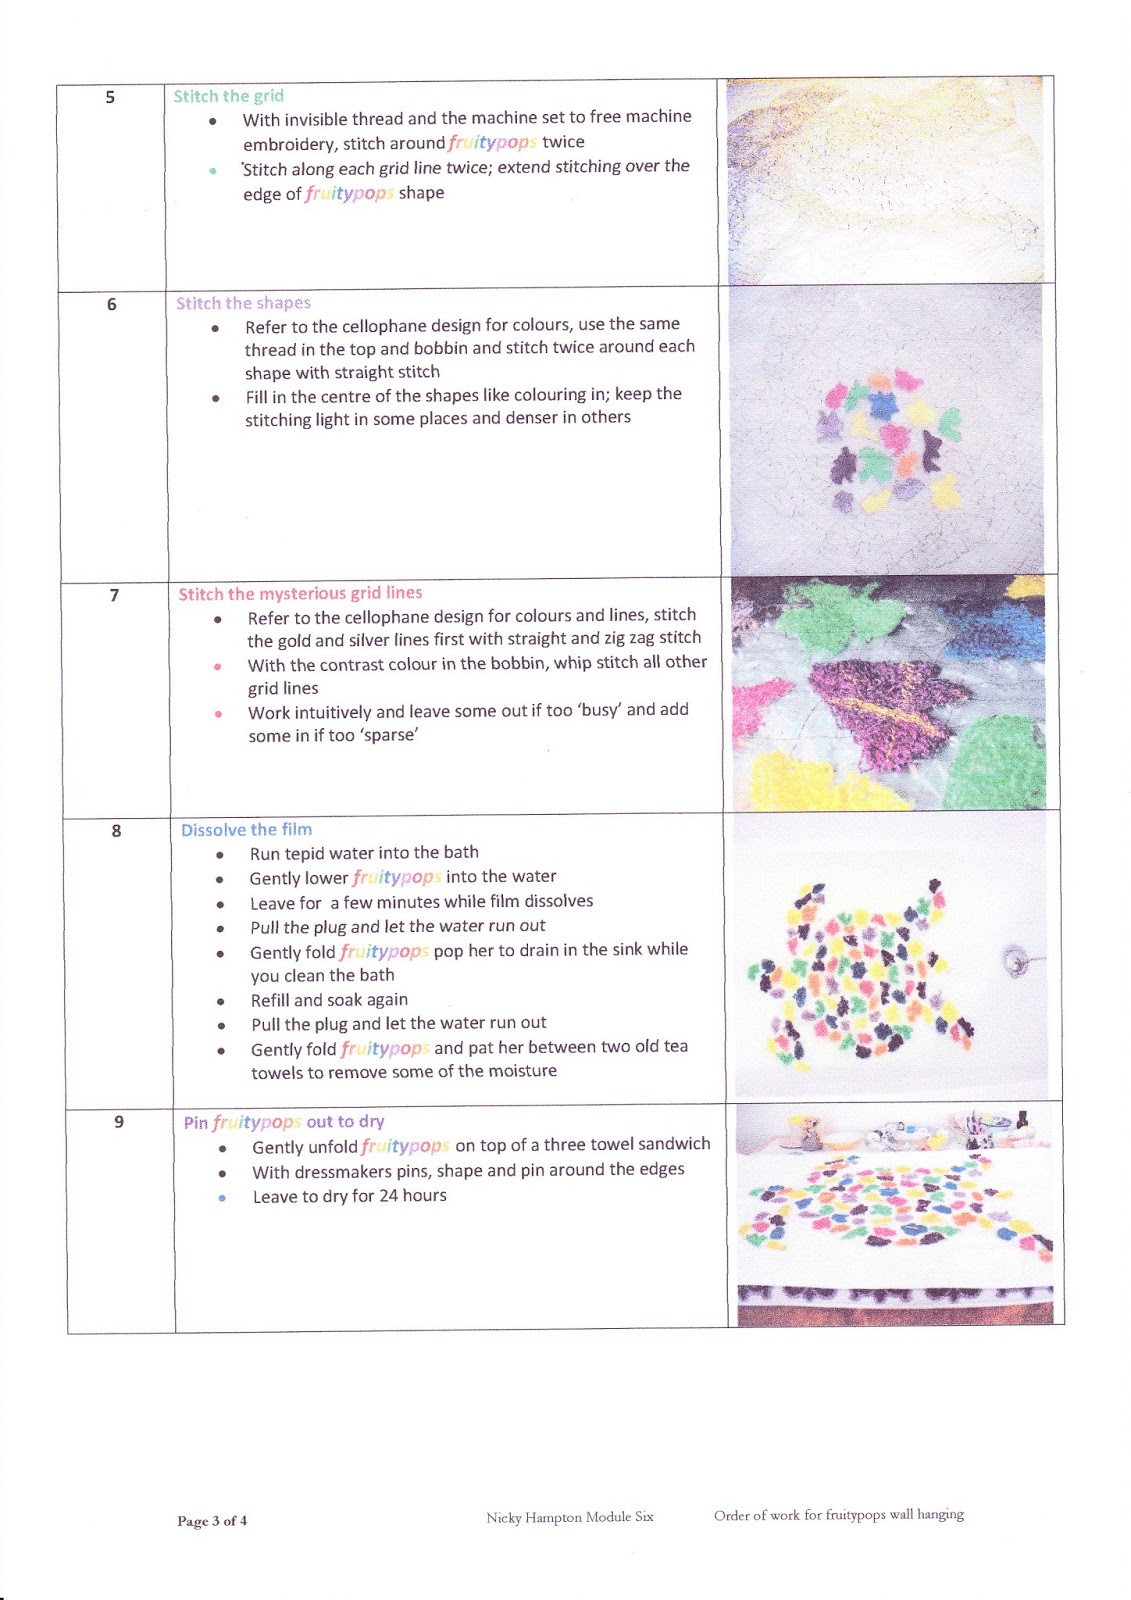
37 Order of work
Below are scans of the order of work that I prepared for my folder. Initial pictures of cutting out all the pieces to create the design were lost when my computer crashed.
38. Evaluation of completed work
It was always touch and go whether fruitypops was going to survive being dunked in the bath. I spent quite a long time holding the work up to the light before dissolving it to make sure that all the gridlines crossed each other.
Am I satisfied and what do I especially like?
Yes, it was a challenge to stay focused and stick to the brief. I like the colours, mysterious lines in whip stitch, the cast shadows and that I found a way to use some of the rubbish I'd collected from the beach. Also she looks a little delicate and that's something I wanted, although the technique is fairly robust. A little breeze and she swings slightly. This picks up the floating and drifting elements of the research.
And I'm pleased she looks beautiful and that's good enough. It's only closer inspection that picks up a more sinister theme. Friends who have seen her are fascinated by the quirky bits of text and peer at fruitypops, heads tilted to read what's on her and figure out the story.
I like the fact that although this is a 2-D wall-hanging, the back looks as good as the front and so would be a good technique for making a 3-D piece, a mobile for example
Changes to the design if I made it again: If I were to make it again I think I'd make more pieces, fruitypops looks lonely and a narrative would be more playful and interesting. I have already sketched out some long-snouted seahorses to try.
I have included the original sample as part of the piece with a little tissue paper label that says 'sample'. I've also used some of the inked and stamped design papers which I stamped with the title, my name and stencilled the year, 2013.
fruitypops wasn't made with a specific space in mind and I've learned that it's important to know the space you're designing for right from the outset. I would also be more aware of the surface against which the piece would hang. My wall is plain magnolia. A slightly distressed surface perhaps with a hint of green or blue might be more effective.
Changes to the way I made it: I'm happy with the technique used to make her. I think it's simple but effective. Having said that, I would rethink my use of nylon invisible thread. This is, on reflection, as unfriendly as the plastics I collected from the beach and in direct conflict with my overall theme.
I did change and adapted the original concept at the outset of making. The A1 Romeo was too large and unwieldy to stitch and became brittle and split. I trimmed a lot away leaving me with a smaller embroidery. I harnessed Barbara Lee Smith's wisdom, that sometimes mistakes or unexpected outcomes can take us somewhere new. (See my artist's study on Barbara)
Dissolving the stitch distressed the finish slightly and reflects the conservation theme. I wasn't able to hang as planned with invisible thread. It was so invisible that I had trouble manipulating it and it wasn't strong enough. I tried fishing line but found it too stiff for the effect I wanted. However, the pegs allow me to manipulate the legs, scrunch up the body or tilt the head.
39. Health and safety rules observed
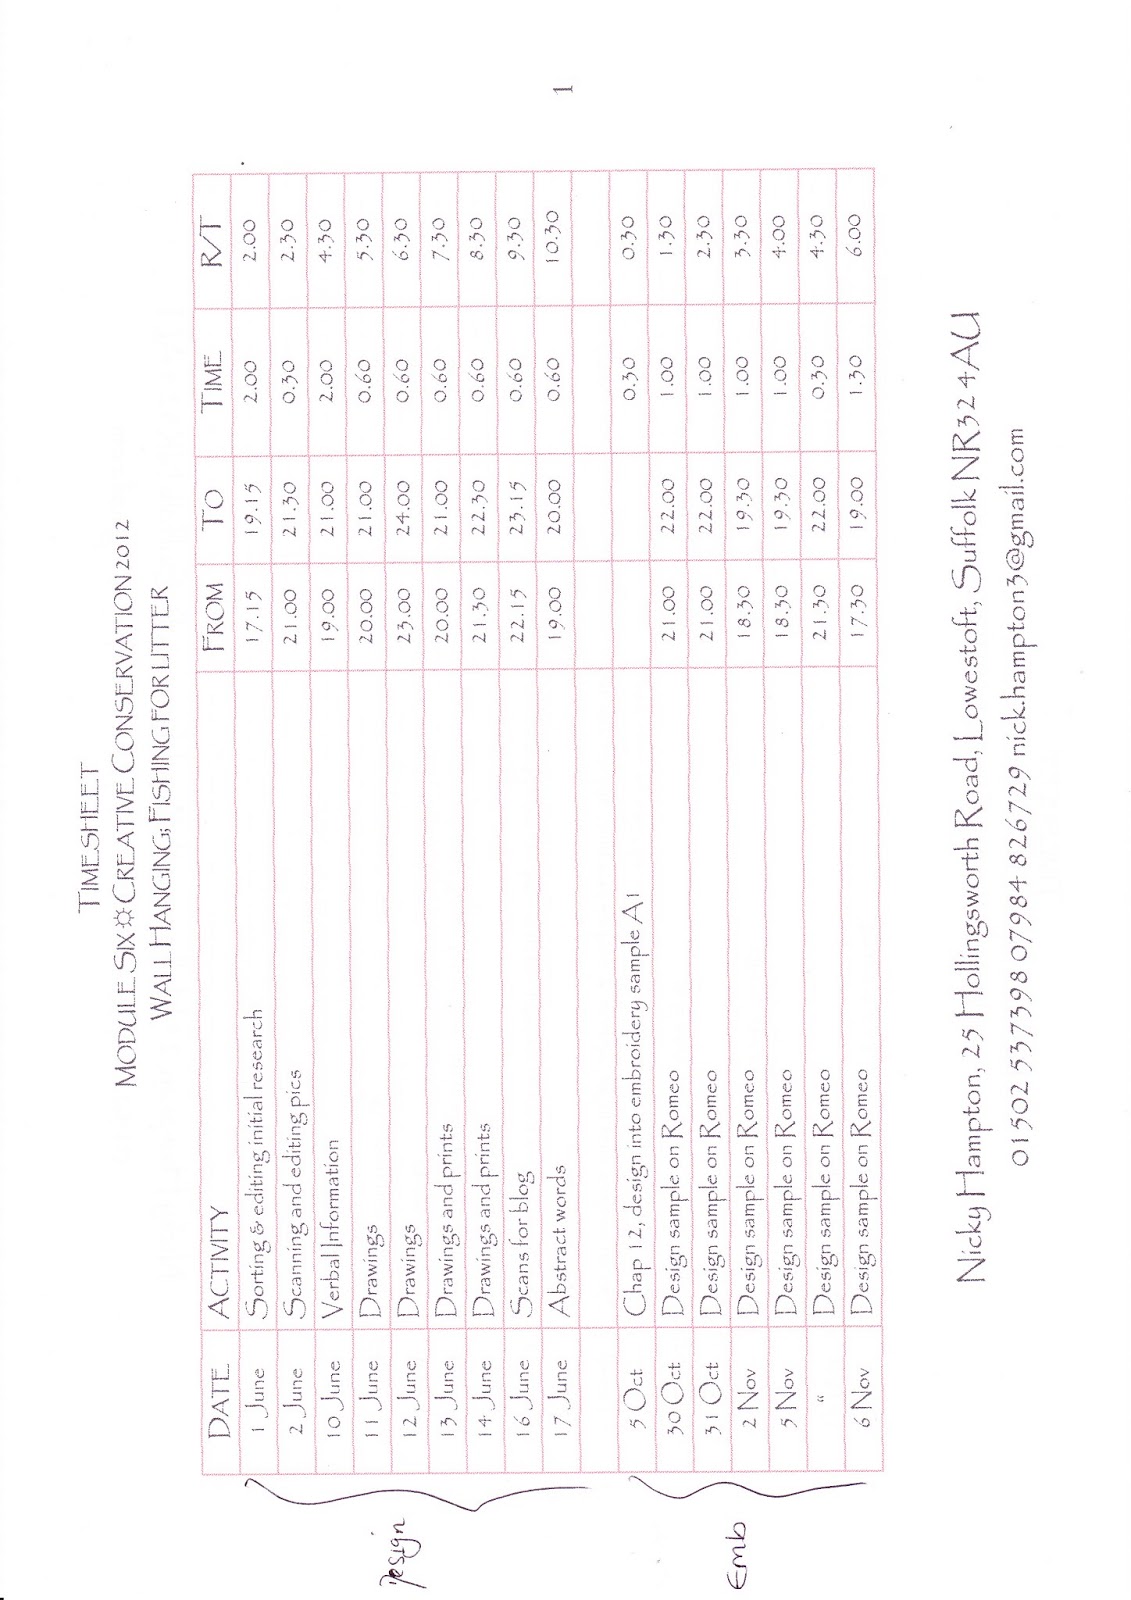
40. Costing materials and recording times
I tend to work in the 'cracks of time'. Sometimes only 20 minutes a day, with slightly longer periods at the weekends.This is because I work and I'm tired and a bit sore come the evenings which are lingering symptoms of the RSI (repetitive strain injury) or perhaps it's my age!. Surprisingly these cracks added up to approximately 70 hours in total.
41. Storage of work, materials, tools and equipment
I am fortunate to have 'a room of my own' in which to work.
42. Authenticity
My friend Kerry kindly authenticated my work. She and her husband live close by and often pop-in. She is a keen crafter and saw fruitypops evolve. We had a delightful evening when I introduced her to dissolvable fabrics showed her how to use Romeo.
That's it Sian... finis.